Hi, hope you're having a great week so far. I've had a manic week with work, so it was a welcome change to make some cards.
Today I have another three cards to share as part of my Altenew Educator Certification Program. I'm near the finishing line now. One more assignment to go and then I have to deliver a virtual workshop, eek!
Here are my three cards, with more info on how I created them below:
If you're not familiar with Zentangle, check out Zentangle.com. In their words, "the Zentangle Method is an easy-to-learn, relaxing, and fun way to create beautiful images by drawing structured patterns".
The drawings are often penned in black, but colour is also added at times. Note, a finished piece of work is called a Zentangle. The patterns themselves are called tangles. When you draw the patterns, you're 'tangling'.
I have been tangling for about ten years, so I was very excited when I saw that there was a masterclass teaching how to use it alongside card making. I'm actually training to become a CZT - Certified Zentangle Teacher - next month so that I can teach it to people, as it's such a lovely, mindful thing to do.

I loved watching Amber's classes. I enjoyed learning how she used watercolour and added Zentangle detail behind the smooshing to create backgrounds. I also loved how she showcased combining Altenew floral stamps with some of the Zentangle patterns. It was a very inspiring masterclass.
Let's get onto the actual cards:
Card One - Aura

I used a Zentangle technique called 'aura' for my first card. This is where you draw one line and then echo the line by tracing another line outside of it. In this case, Amber shared how to use the aura method to create lines on the flowers. I did the same technique on my flower; only I coloured my lines in.
Here's how I made it:
Stamp Wallpaper Art flowers using Memento black Ink on watercolour cardstock. (I used this because I wanted to use a Zig Clean Brush Marker for the flowers).
Colour the flowers using Carmine Red, adding water to dilute the colour.
Using a 0.5 UniPin Fine Liner Pen, draw lines on each of the petals, each time 'echo-ing' the line before.
Once all of the lines are drawn, fill in each alternative stripe with a black pen.
Die-cut the flowers, die-cutting two extra flowers for each size to create stacked die-cut elements. Set aside.
Die-cut a piece of watercolour card using a stitched rectangular panel.
Draw on a 'frame' and tangle using the Barberpole pattern. Start by drawing the frame in pencil, then add in the sections, and then colour each alternate section in black.
Next, add some fine-line detail on every alternate white section.
Using a charcoal pencil, go around the top and bottom edges to add some shading. Blend with a tortillon (also known as a paper or blending stump).
Add some white highlights on the black sections with a white gel pen.

Stamp the sentiment from Altenew's Painted Encouragement underneath the frame.
Attach the three die-cut flowers to the frame.
Add paint splatters to the front with white gouache paint to finish.

Card Two - Tangled Letters with Die-Cut Inlay

I was going to type the next two cards up as bullet points, but they are easier to write out for you in full. I've just always got far too much to say!
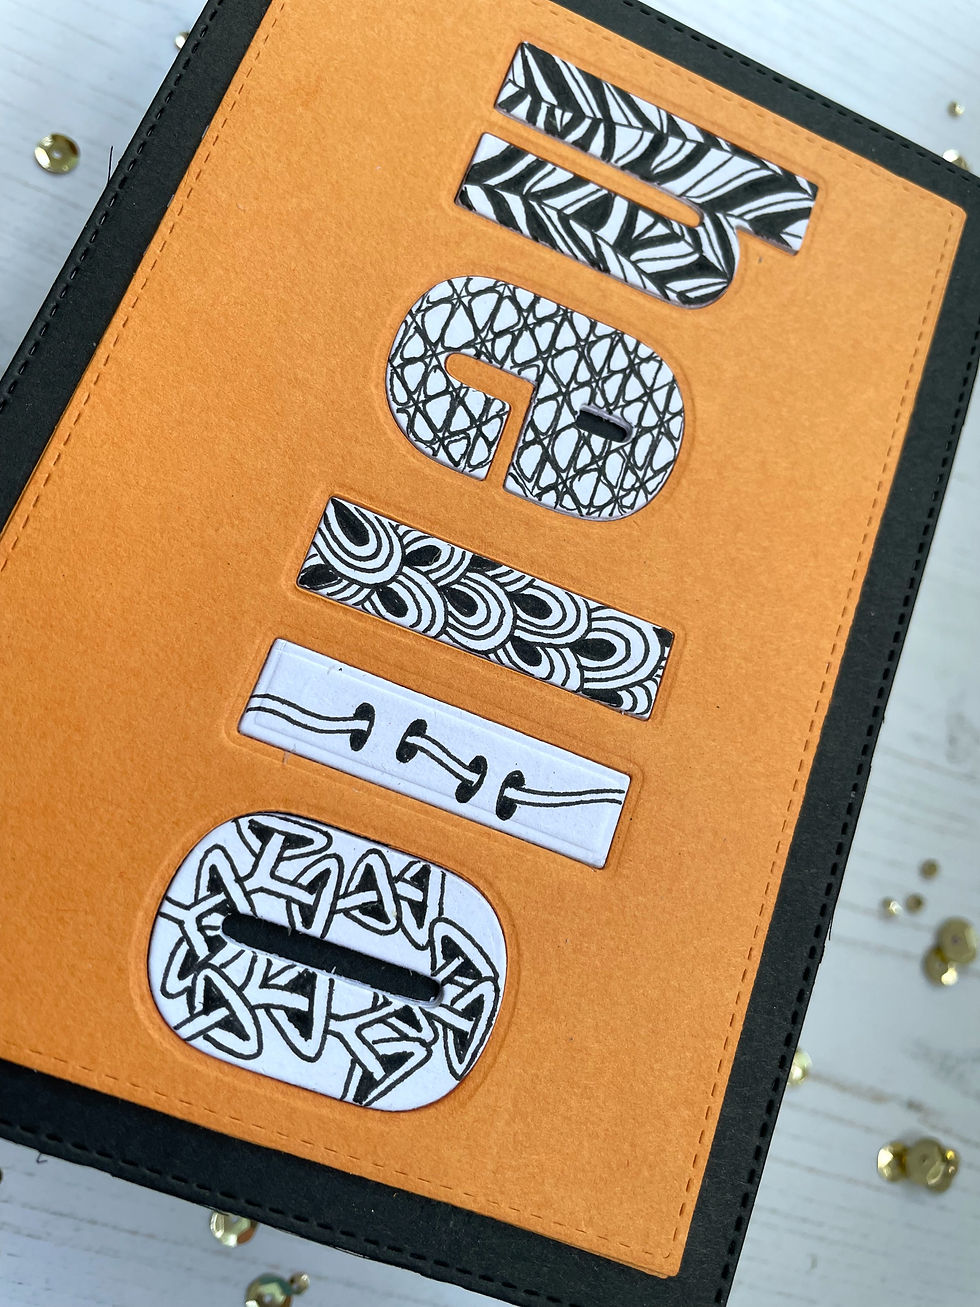
I followed Amber's idea of tangling some letters for my second card. I pulled out my Altenew Bold Alphabet set. I die-cut the letters for the word 'hello' and then sat down with a coffee to decide which patterns to use.
Top Tip: The coffee makes all the difference for creativity, haha.
My go-to resource for patterns is Zentangle.com (the founders of the Zentangle method) and TanglePatterns.com, I chose the following Zentangle patterns from the Tangle Patterns website:
H - Flameta
E - NZeppel
L - Zghetti
L - Laced
O - Rixty
Serious Top Tip: There is SO much inspiration online. If you're feeling a bit stuck, check out Pinterest, Instagram and YouTube as a starting point. In no time, you'll have a list of new ideas :) If you want to tangle, then TanglePatterns.com is a fantastic resource.
I tangled each of the letters using the patterns as shown above. I then die-cut more letters so that I could create some stacked dies. In hindsight, I'd have made my life SO much easier if I hadn't used stacked dies and simply created a one-layer card. You live and learn!

Once the letters were sorted, I did the background. I die-cut a black stitched rectangular piece and attached it to a white card base.
I then lined up my letters from the Bold Alphabet set and die-cut them in white cardstock so that I could use the negative as a template. I then cut one negative panel in orange cardstock and two more in white cardstock to create the stacked die effect.
Now, because I had to do two of the letter 'L' and was using the template, I found that I wasn't getting the nice embossed outline on the second 'L'. I ran the panel through my machine with the embossing mat, which fixed the problem.
Top Tip: If you have to duplicate letters in your word and aren't getting the outline embossed effect, attach your letter die over the top of the letter and run it through your machine using an embossing mat. This will create the 'missing' embossing.
I stacked up all of the pieces with the orange cardstock on the top and attached it to the black base. I then popped in the tangled letters.

I debated whether to add pearls, but it didn't work, so I went for a clean and simple look.
Card Three - Watercolour Smooshing

In the masterclass, Amber used some watercolour smooshing and doodled some tangles into the white space. This was such a fun technique.
I started by doing some ink smooshing. I randomly added small amounts of colour to a piece of acetate using the Turquoise and Purple Wine Watercolor Brush Markers. I then spritzed the droplets with water from a spray bottle.
I then used another piece of acetate to pick up the colour and 'smoosh' it onto a piece of watercolour cardstock, creating a lovely watercoloured background.
While the panel was drying, I die-cut three black frames using the Altenew Gem Frames die. Then, using the same die, I selectively die cut the centres of the Gem Frames die to create 'hexagons' to use in the centres of the three frames. (I'm not sure how you can describe those centres, so hexagons will have to do!)
Next, I did some tangling over the hexagons with a pattern called 'Veruca'. Amber's technique is to skip the watercolour patterns and follow the lines so that it looks like your pattern is behind the watercolour. I LOVE this effect; it's really fun to do as you have to go with whatever the watercolours give you. It's all very unexpected, a bit like Zentangle.

I added some shading to the 'flowers' with a graphite pencil and blended it out gently with a tortillon. Next, I added the hexagons to the black Gem Frame die cut centres.
I stamped a sentiment from the Altenew Label Love stamp set, which I cut out by hand and attached to a strip of silver glitter cardstock. I stacked this up with two pieces of scrap cardstock.

Before attaching the sentiment to the card base, I added some black splatters with the Altenew Artist Watercolour Pan Set (I used Rock Collection).

I attached a small length of Altenew's Metallic Thread in Silky Lilac to the card base and added the sentiment on top to finish.
Top Tip: Threads can be tricky little monkeys! I've found that securing the ends with some double-sided tape works really well. Those little ends like to unravel. This seems to fix that problem.
That's it from me today. I hope you liked seeing a different way to create cards using the Zentangle method. If you're interested in Zentangle, start with Amber's masterclass - she's got some fab ideas for card makers :)

Supplies Used:
Please note: I've linked to various companies in the thumbnails below. Some of these are compensated affiliate links, and I may receive a small commission if you choose to buy something after clicking through. This is at no additional cost to you. I really appreciate your support.


Beautiful work!!